
[Updated 22 Feb 2020] When my family and I were cleaning up my grandmother’s estate, we were stumped on what to do with her big collection of photos. My uncles were doing all the heavy lifting, probate-wise, and I volunteered to scan all the photos, negatives, and slides, because I had a flatbed scanner that could do all three formats. I had no idea what I was in for. That was 6 years ago. I have learned MOUNTAINS of what to do and what not to do. Here’s a blog post I wrote about the first project.
I thought I’d share my setup with you, and how I got to where I am today.

The setup today
I have a scanning station:
- PC: A refurbished Lenovo ThinkCentre M Series running Windows 7, running Adobe Lightroom (desktop version)
- 2 backup drives: a Lacie and a Seagate, each with 2 terabytes (TB)
- Scanner #1: An Epson FastFoto FF-640 automatic feed photo & document scanner, which will scan 75-1200 dpi. See my review here.
- Scanner #2: A Canon 8400F flatbed scanner (bought 10 years ago) which will scan 50-1600 dpi and has trays to scan i) 35mm x 12 frames (negatives); ii) 35mm x 4 frames (mounted slides); and iii) Film Strip (120 roll film)
- A journal, where I keep a running log of what I’ve done (see below)
- Several USB drives, to transfer the scans to my laptop when I need them
- VueScan Pro


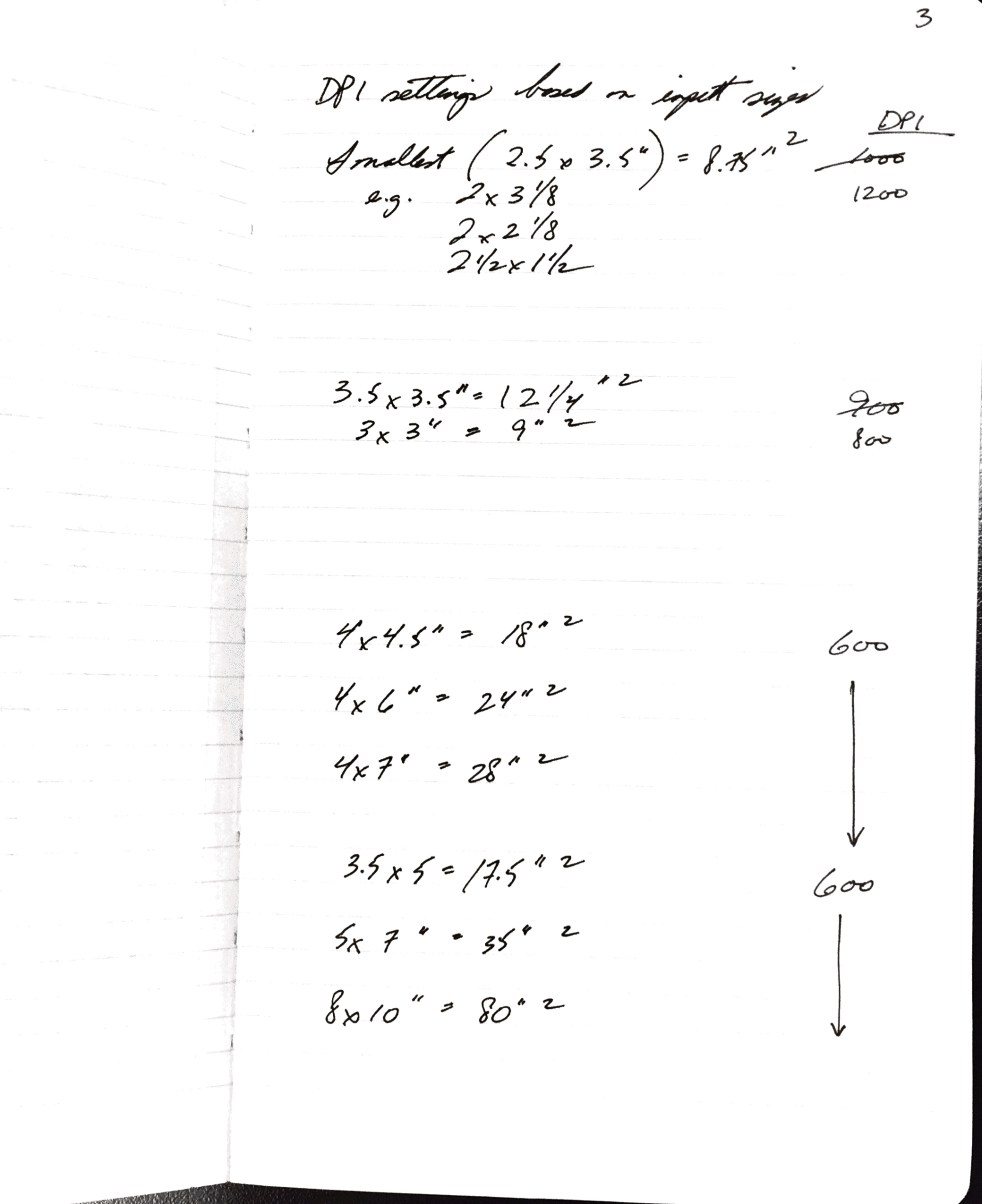
My journal: dpi settings, naming conventions and progress
The key in a project like this is consistency. I can’t remember things I did last week, never mind dpi settings, so I wrote them all down for reference:
- Scanning rules for naming conventions, dpi settings and anything I want to ensure is the same for all scans
- Date and time spent
- Beginning and ending Photo ID #’s
- Notes and questions on what I’ve scanned (some of which I capture for genealogy research), i.e., Engagement party photos, circa 1940s, who are these people, where was this taken, who is getting married?


My unorthodox solution
What if you could “freeze” your operating systems? What if you could set up your scanners, get them calibrated and working perfectly, and then leave it alone? What if you kept the computer off the internet for the most part, and never used it to surf? That’s what I’ve done.
I’d been looking around for a copy of Windows 7. At the time, Canon USA wasn’t offering device drivers for anything beyond Windows 8, and I liked Windows 7 anyhow. I visited a computer depot which sold old office equipment, walked in thinking I could buy a copy of Windows 7 for ~$150, and walked out with a refurbished PC with Windows 7 already loaded for $300. It was like getting another computer for $150.
[Update 22 Feb 2020] I still have this setup but am considering buying another refurbished PC. Win7 has been a great workhorse but Lightroom is getting slow and clunky with the ~40K images I’ve collected.
The results
For those who like results by the numbers: the grand total is 35,062 images as of today:
- Chu family scanning project: 2.32 GB; 7884 images
- Yip family scanning project*: 20 GB; 789 images
- Personal photo archive aside from the above: 68.6 GB; 26,262 images
*The Yip scanning project is when I switched from .jpg to .tif files.
Why this works for me
Running two scanners is efficient. I prefer the ease of the Epson, which not only scans ultrafast, even at high dpi settings, but also has an automatic counting setting. Each scan gets its own unique ID number.
However, not everything can or should be scanned through the automatic feed. For all of these, I use the flatbed:
- Fragile documents
- books
- prints that are too tiny or too thick
- Negatives
- Slides
The downside
There are a few downsides to this setup, the largest of which is inconvenience. If I want to use any of my scans, I have to go to my office, find the ones I want, export them to a USB drive, and transfer the scans to my laptop.
The second consideration is space. This won’t work on your dining room table (which is where I first set up, to the chagrin of my husband, who strangely didn’t want to eat meals with the continual hum of the scanner running).
Why I settled on this setup
Constant operating system upgrades and changes that mess up my systems were driving me bonkers.
I’ve moved through several iterations of laptops and operating systems. The Canon and its packaged software have not kept up with the times. With each move, I’d have to locate and install device drivers. (I’d rather file my taxes than find and install a device driver.)
HINT: If you own an old Canon and need device drivers, you must go to the Canon USA site. You cannot find them on the Canon Canada site. (Don’t ask me how long it took for me to learn this, but it was counted in years, not days.)
Why not buy a new flatbed scanner?
If you can easily do that, go for it. Me, I’m against tossing out something that works well just because it’s an older model. If I win the lottery tomorrow, though, I’m going to buy the Epson v850. What a beauty, and what a price tag: CAD$1349.
Other solutions: VueScan
VueScan is a company that makes device drivers for scanners. Yup. There is a business out there to fill in the void left by scanner manufacturers who clearly have trouble keeping up with OS upgrades. I did run a few tests on VueScan but opted to go with my setup as shown here. It’s good to know there’s an alternative. [Update 22 FEb 2020: I bought and installed VSP in 2019. It runs both the Epson and Canoscan scanners very well.]
Outstanding questions I still have
What on earth should I do with all of the photos now? I do not have unlimited storage or funding for museum-quality materials for 35K pieces.
Postscript
The idea for this post came from a Facebook discussion in the group Technology for Genealogy. Scanning and organizing are two big loves of mine – the natural outcome of a former commercial graphics professional and an executive legal assistant – and I thought it made a good topic for an expanded discussion. I hope it’s been helpful.
Next week: Tips for anyone starting a photo scanning project
This is hugely helpful – and I bought the new version of the fastfoto scanner. Two questions: I see your codes, but what is your file naming rule? Second, what software are you using to manage your images? Not to edit, but just to index or track Metadata? And I guess a third question: are you doing anything similar with documents?
Hi Cate!
Those are good questions.
To manage my archive, I use Adobe Lightroom 6 – the desktop version. I believe you can still find it for ~USD$149 / CAD $211. I choose the desktop version because I tend to try to avoid signing up for monthly payment-anything (helps control costs over the long run) and ii) because I don’t want to put too much time and effort into a program that is free and can be revoked by the manufacturer. My previous setup was a Sony product which I LOVED and spent countless hours with, so you can imagine my dismay when Sony suddenly stopped supporting it and I lost all that work. Never again!
I use Evernote for documents, and have written several posts about it. You might like to check out this post: https://past-presence.com/2018/06/24/whats-evernote-for-genealogy, or check out the Evernote category on the categories at right.
I will be covering naming conventions in my next blog post. Stay tuned (or sign up) for that!
Great hearing from you!
Linda
Looking forward to your upcoming naming conventions post very much! Also thrilled that you use that terminology – I was a data administrator for big chemical companies in my past life, so this is a topic near and dear to my heart. So happy to have found your blog. (The new Epson scanner shows up today. Wish I could have gotten you a commission.)
Ohhhhh it was like Christmas all over again when the Epson arrived at my door. Have fun! I attended a presentation yesterday night by a woman whose business is helping people archive their family collections (Angela, of Saskatoon Organizing Systems). I was pleased to see that I already followed many of her processes and that she also relied on an Epson FF-640.
So you’re an ex-data administrator! I’m an ex- executive legal assistant and I worked in litigation. I’ll share this with you because I know you’ll appreciate it. We loved our naming conventions, which are flat out essential when you are organizing tens of thousands (and in some not-very-rare cases) hundreds of thousands of documents. I never set out to compile a personal 30K+ photo archive but I’m so glad I took the time to consider the “how to” before starting.
You probably saw that I started an abbreviations journal for my scans. I like thinking through the implications of what I am scanning from a genealogical perspective as I scan, and tagging certain photos accordingly. This is a fairly slow way to process images (but did inspire several eureka moments with my own family history). Angela of SOS recommends using a photo archive software for applying keywords to the metadata of an image, and for batch naming (and she uses Adobe Lightroom). I think I’ll adopt her methodology and drop the attempts to tag photos during the scanning process UNLESS I find an image so compelling and memorable that it needs tagging to distinguish it from the bunch.
Great chatting with you!
Great insights and comments. Just starting to get organized to start scanning boxes of pix.
Hi Chris – congratulations on your project! You’ve inspired me to write a quick blog post collecting all the scanning advice I’ve written so far. Stay tuned.
Hi, there is no need to either buy a brand new scanner, or to have to anchor yourself to the dead weight of a separate Windows 7 machine.
I have an 8400f that I’m using just fine the native original Canon Scangear software in Windows 10. The latest version of Vuescan professional will work of course, but at least from what I’ve seen when it comes to negatives I have not been able to get it to knock out consistently better output even with 48-bit color, then what I get with a lot less hassle and intervention using the old legacy scangear and its options and optimizations.
There are a number of posts out there on the web and on Reddit about how to essentially use the old Windows 8 x 64 drivers and install them to Windows 10. And then of course the old legacy Canon software for Win8 x64.
Works fine with no problems, I use Canon’s software to output to TIFF or JPEG and then I mess with it in Photoshop. Using the default options for backlight compensation and fading compensation and changing them as needed from roll to roll, gets me closer to final output then anything I can put together options wise in Vuescan – both require me to dive into Photoshop anyway.
I would say to you and anyone else apprehensive about diving in on an older top end Canon scanner with slide and negative scanning options, go for it, as modern scanners that have the capability are far more expensive than what you can find used or refurb from the 9xxx series. A similar driver work around can be done as I mentioned above. As long as there is a Windows 8 driver, you can get it working in Windows 10.
I recall I had some trouble finding the old Canon software. I loved the Scangear setup. I finally caved and now use VueScan Pro, which means I can, if I wish, upgrade to a more modern machine. When budget permits of course.
https://www.usa.canon.com/internet/portal/us/home/support/details/scanners/support-scanners-canoscan-series/canoscan-8400f
It’s still there. Get the Win 8.1 x64 version, that’s the latest they released. You can install it in Windows 10 easily using the instructions on this thread. https://www.pentaxforums.com/forums/32-digital-processing-software-printing/301653-windows-10-canoscan-8400f.html
I’m scanning negatives using Scangear and the 8400F right now on a more modern i7 machine with 16gb ram, Win 10 right now.
I did not like Vuescan at all for negatives on 8400F, it required a ton more fiddling to get results that arent as good. It doesnt utilize the corrections and scratch/grain removal as well as Scangear does.
The drivers and scangear do indeed install and work fine on Win 10 give it a try and save yourself the headache of VueScan.
Hey Paul, I think you’ve just given me the formula on what to do when I upgrade my PC if my flatbed holds out. I’ve been running Adobe Lightroom for all colour corrections rather than using scanning software. This is mostly because I want the uncorrected originals, but I agree, when I was scanning negs with correction, I preferred Canon’s software.
The 8400F has been making some odd noises and stalling on startup. It may be that when I go to upgrade the PC I may need to add a scanner too. I did a short series of large format negs about a year ago at maximum resolution (can’t recall the setting) and the scanner barely made it through.
https://www.pentaxforums.com/forums/32-digital-processing-software-printing/301653-windows-10-canoscan-8400f.html
How to get Windows 8400 working natively in Windows 10
Last thing, as far as what to do with all those photos, one way to combine saving all of them at full size and resolution, and use arguably the best cloud photo service for sharing and any purpose really, is to use Google Photos.
The caveat, is that you will have to make the slightly extra effort to pick up any old first generation Google Pixel phone. Even if it has a cracked screen doesn’t matter. Though Google has changed its policy for every other pixel phone, any photos and videos backed up from the original Pixels are saved at Full resolution for Life. Of course what for life means to Google is a good question. But this is probably in the meantime the best extreme low-cost way of storing everything at maximum resolution uncompressed, and still able to be easily shared and viewed by anyone you choose across any platform.
https://www.droid-life.com/2021/02/01/how-to-keep-unlimited-google-photos-backups/
You will have to essentially copy over all the content to the relevant local directory on the pixel. Once done you can turn on Google Photos sync and let it upload away. No, if you have stuff stored in raw format I believe the only format Google photos will ingest is DNG, so you might want to do a sample upload to test first.
Lots of people are doing it with other branded phones backing up to their pixel, with no issues. Google does not seem to be checking exif data or caring about whatever limited slice of the population is using this hacky method.
Provided youre willing to pick up an original pixel with a cracked screen off eBay for something like 30 to 40 bucks, this is a pretty painless way to get it all done.
Paul, holy cow, thank you for sharing your advice and expertise. Please give me some time to absorb all that you’ve contributed here.